Why Set Up Subtitles
While subtitles may seem irritating especially on smaller screens, they are actually much more common in movies and TV shows then you may think especially with today’s movies. If you read my article on how to rip a DVD or a Bluray, you’ll find that I picked my Rise of the Planet of the Apes movies. But here we’re going to use the movie Elysium. One of the reasons why I picked it was because if you watch the movie you see several scenes where our hero is talking in Spanish. Unless you speak Spanish you may find that you are completely out of the loop unless you did rip the subtitles, but if you didn’t, fear not, we have you covered.
A feature of Plex Media server is that it supports subtitles if they are in either an(srt) or (ssa) or (ass) format. That’s not a typo. They can be turned on or off at your convenience just by going to the settings on Plex, either on the server itself or on the device that you are streaming to.
One of the things that I’ve noticed with great consistency is that when you buy a Blu-ray + DVD combo set, the subtitles will always match and it’s much easier to rip the subtitles from the DVD then it is from the Bluray. So with that in mind, we are going to extract the English subtitles from Elysium. And from that, I’ll show you how to separate the ‘needed’ subtitles from the rest of the subtitles for those who are deaf and set it up so that our Plex Server will be able to use it.
What you need to get started
For this, we are going to use software called Subtitle extractor Follow the steps below to get started.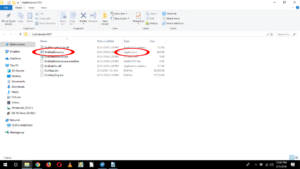
- Download Sub Extractor here.
- Once you have picked the version that you want you’ll be downloading a zip file
- Extract the zip file to your desktop. This will create a file folder called “SubExtractor”
- Open the file folder and you will see the application file named, appropriately “DVDSubExtractor”.
Step 1 Launching DVDSubExtractor
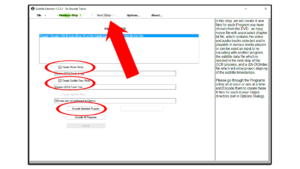
 Double click on DVDSubExtractor to open it and click on the ‘Browse DVD’ button. This will open up a box to navigate to the DVD you ripped using DVD Decrypter. Once you have selected the file, you will see it being loaded into the dialog box. Just click on the green arrow that says “Next Step” at the top of the screen.
What You Will See Next
- The top navigation box contains all of the video files (titles) on the ripped DVD. Titles that contain subtitles will automatically be checked. You can check all of the titles if you wish because one of the features of this software is that it will extract all of the titles in an MPEG video format keeping the exact same quality as your original DVD.
- The audio track navigation box tells you what tracks are available on the DVD. The first “English” audio track is usually the audio for the film while the second or third audio track contains the Director commentary or Descriptive audio track. You also have the choice of extracting French and Spanish audio tracks as well with most DVD’s.
- The third navigation box simply tells you what subtitle tracks are available on the DVD, you will pick which subtitle you wish to extract later in the process. Once you have made your selections, simply press the green “next step” arrow at the top of the screen.
Step 2: Choosing the correct titles
 Choose which of the titles you wish to extract by highlighting them with the blue highlighter.
(Note for people extracting TV series instead of movies)
With some TV series, you may have one large title that is two or three hours along with some shorter titles only 20 to 50 minutes. The shorter ones are individual TV episodes while the longer title is all of the episodes combined. For Plex it’s best to just pick the individual episodes leaving the longer one alone. Once you pick your episodes place a checkmark next to the items you wish to have.
For Movies
In our example, we are going to extract both a movie file as well as the subtitle files. The DGIndex option is to extract chapter markers. Click on either the “Encode Selected Program” or “Encode All Programs” whichever is applicable. You’ll see a green status bar as the program does its assigned tasks. Once the encoding is complete the ‘Next Step’ arrow on the top of the screen will turn green telling you to proceed. Click it.
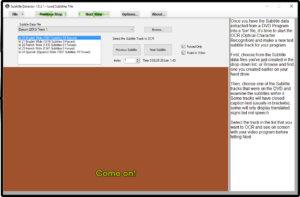 Step 3: Selecting the best subtitle track
Select the subtitle track that you wish to extract. You may notice that you are provided with multiple ‘English’ options. With some DVD’s you will be given the choice between English or English (Wide). Wide will refer to the placement of the subtitles on the screen when watching a DVD.
For our purposes, it doesn’t matter which version we choose when given that option. What we want is the ‘forced’ subtitles.
Pick the first choice and place a checkmark in the ‘Forced Only’ option, once you have selected it simply click on the green ‘Next Step’ arrow at the top of the screen.
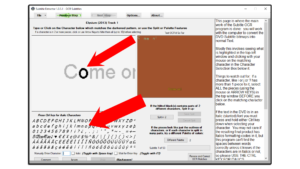
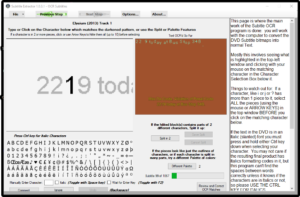 Step 4: Dealing with understanding issues
This part is a little complicated. Because the DVD uses a graphic based system, the software will need assistance in ensuring that it is making the right choice, a process that is especially difficult for it when choosing between a lowercase ‘o’ an uppercase ‘O’ or the number ‘0’.
Simply pick using the keyboard at the bottom of the screen or by typing the appropriate letter on your keyboard. Italics can be turned off or on by tapping the spacebar during this process.
If you make a mistake simply click on the ‘undo’ at the bottom of the screen.
Letters VS Numbers
 Another issue is that occasionally the program will see several letters or numbers that look like they are joined together. It is very common when using italics and when two ‘f’s are next to each other such as in the word ‘affectation’. Click on the ‘split in two’ box. You may need to tweak it slightly by hovering your cursor over part of the letter to change it to green. Once you have finished, our ‘next step’ arrow at the top of the screen will turn green. Click on it to proceed.
Step 5: Confirming words Occasionally, the software will have difficulty making sure that the words are correct. This is extremely common when dealing with words like ‘Illegal’ where you will have a capital “I” and lowercase “l’s” in the word. It will give you several possibilities to choose from, just select the correct word setting with your mouse and it will proceed to the next word.
 Step 6: Naming and saving your file properly
In order for Plex to access the file correctly, you need to make sure to save the file in the correct format. Below are some examples on some format suggestions on naming your file. In our case, we did so with Elysium.
Elysium (2013).srt
Elysium (2013).en.srt
The (.en) between the title of the movie and the file extension will tell Plex that it’s an English subtitle with srt files, eng is used for SSA files. If you leave out the formatting Plex will show it listed as an ‘unknown’ subtitle.
Also ensure that the subtitle file is named exactly like the video file. See below and note the ALL CAPS naming on the MKV file.
ELYSIUM (2013).mkv
Elysium (2013).srt
Special Note
While the two files are both named Elysium, Plex will not associate the subtitle file with the video file because the video is in all caps, this is especially important with titles like “Planet of the Apes” where you may have capitalized the first letter of each word on one but not on the other.
Once you have saved your file, simply save it in the same file folder as the movie, Plex will see it and give you the option to turn on or off using the settings on your streaming device.